 Well, it's a Bon Appetit magazine recipe...they're usually well written and easy to follow, which results in delectable amazing-ness! Here's the run-down of cake assembly:
 You start by laying down one of the meringue layers. I 'glued' it on to the cake keeper with some frosting. I guess it was necessary, but it make cutting neat slices challenging.
 Meringue, frosting, cake, syrup, frosting, meringue, frosting...
 I used a decorative tip to cover up the messy frosting edges; I'd like to try making this cake again, just to go for a neater, more consistent look.
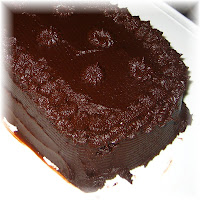
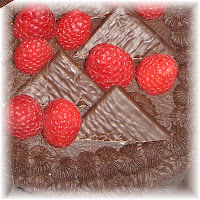 And finally, the end result. Despite my qualms over the frosting, it turned out! And since this cake was meant to be a 'thank you' cake, I'm glad it did.
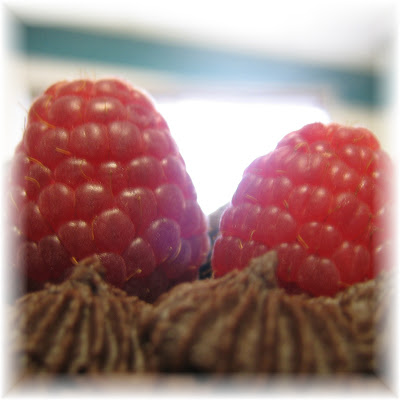
The original recipe calls for fresh mint leaves as garnish, but the ones at S*store were limp and nasty-looking, so I skipped them. As for the raspberries, they were organic (I'm not sure how that's possible in December, but if the label says it, it's true, right?) from the same S*store.
If you'd like to read the actual recipe, check my previous post for the link!

 I'm not sure if that post title means that it's finally time to bake, or that I finally have the time to bake! Either way, I plan to start the Peppermint Meringue Cake with Chocolate Buttercream (from Bon Appetit Magazine's December 2009 issue) as a thank you to all the wonderful people I work with. I've even managed not to scarf down the box of After 8s I bought to decorate the top.
The picture is from the magazine...if my version turns out even half as gorgeous, I'll be happy. I know I won't be using fresh mint; it's just too expensive and even the expensive stuff is wilted and sad-looking. If I can find fresh raspberries I'll use them, but they're not exactly cheap either.
If you'd like to visit the magazine's website (and see the recipe too) just visit their website by clicking either of the linked (underlined) words in the text. The first will take you to the general Bon Appetit website, while the second will take you to the recipe.
Wish me luck!

 My decision to bake this cake rested solely on the fact that it uses only egg whites, and I have a healthy amount that need to be used up. (see the next post, when it appears, to find out why) But sometimes it's nice to bake something that requires absolutely no skill at all. Just dump the ingredients, mix, and plop it into the pan! If this cake tastes even half as good as the batter, it'll be a 'file-for-future-reappearances' cake, for sure. It doesn't even need any kind of ganache, icing, or topping! (I did dump some left-over maple caramel on top...I hope it's not too chewy!) Since my cake carrier is carrying someone else's cake (I borrowed her cupcake carrier the other day), I needed something that transports with relative ease.
And the finished product:

 which is not quite the same as copying! However, I did follow her recipe fairly closely, so I'm not going to write it out here. If you go want to check it out, visit Tartelette and look for her Vanilla Salted Butter Caramel and Chocolate Mousse recipe. All I did was exchange pumpkin puree for the chocolate and use this maple caramel recipe (half the amount) instead of the plain caramel. I omitted the pecans and made sure not to cook the caramel too long, as I wanted something that would fold into the mousse base.
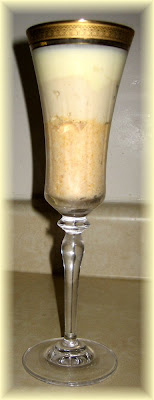
As I'm taking this to work, and as it really requires individual presentation, and as all my clear ramekins are at my parents', I used cheapo plastic cups to layer the deserts. I suppose I could have used my white ramekins, but the layers are what makes this so pretty! I did, however, make just one for myself...in my super fancy Mikasa Palatial Gold Champagne Flute. (Yes, it requires Capital Letters.) Just so that the photo would look better than the real thing!
Adventures along the way:
The first layer was going to be plain vanilla custard, but wouldn't you know it: I cooked the yolks for the first batch of custard. The following process then occured:
Brain: oh no! Custard should be smooth! This has the texture of pumpkin puree! (frantically whisking and sieving)
Other brain (I carry an extra for emergencies like this one): Pumpkin...well, why don't you just make this the pumpkin layer then!
Brain: Ok, in it goes!
Other brain: Wait! Don't you need to add spices?
Brain (sheepishly): Oh yeah. (In go random amounts of cinnamon, nutmeg, and cloves.)
Other brain: And do you really think people will appreciate the taste of raw pumpkin? Shouldn't you have cooked that up together with the custard?
Brain (even more sheepishly): Oh yeah. (Dumps pumpkin in saucepan.) Maybe if I heat it through it will take the edge off?
Nose (sniffing): well, it smells ok so far...
And that was just the first layer!
Making the caramel, I realized that I need (yes, that's need, not want) a digital candy thermometre. Mine might as well say 'hottish' and 'kinda getting close to boiling' and 'oops, that was too much heat for too long'. The caramel, which needs to be soft enough to fold into the mousse (i.e. more liquid than solid) was, although delicious and mapley, definitely not in the mood to be folded into anything. I couldn't remake it because I have a limited supply of whipping cream on hand and it's Thanksgiving; nothing's open. So I heated it a little to soften it, and then did my best to whip some of it into the mousse. The leftovers make really yummy candies, though!
I made the mousse recipe 3 times to make the 3 layers in greater quantities. This meant increasing the amounts of pumpkin and caramel as well. I also made 1.5 times the original amount each time. Now, my math skills aren't exactly what you would call stellar, but I am aware that this probably throws the proportions all out of whack. I'm just hoping that doesn't matter too much for mousse.
The last time I made the mousse was the best yet...I think. I really wanted to make sure this one wouldn't cook up at all, so I left it fairly thin. I was also about 1/2 cup short for whipping cream. I'm hoping a night in the fridge will solve that.
Of course, after separating 16 eggs for the yolks, I now have ridiculous amounts of egg white lying around...some of them will go into a White Spice Pound Cake (see above post).
After all that chatter, here's the final product. If you want to, you can click on the picture to see a close-up, but then the smears on the wall behind the glass become painfully clear...
If you've never checked out Tartlette...do it, now! I'll wait for you...
Isn't Helen's work amazing?!?! She not only concocts the most delightful confections, she photographs said concocted confections so beautifully that even I think I can go and make what she made.
I decided to try her Vanilla, Salted Butter Caramel and Chocolate Mousse recipe. (Click on the link for her post, which contains the recipe.)
While my version was definitely edible, it left a lot to be desired in the looks department.
The things I learned:
- put a heavy-bottomed pot on my Christmas wish list
- be even MORE patient with custard
- the chocolate could be hotter when I fold in the mousse...maybe that way it would be easier to fold in before it goes all chunky
- I'm sooo glad I used my last lonely vanilla bean...the taste is completely different from using flavouring, even the the real stuff
The pictures below show, in order from left to right:
- boiling sugar and water
- caramel
- melted chocolate
- whisking egg yolks and sugar
- cooking up the custard base
- the finished mousse
 And the finished product? Mine weren't nearly as impressive, but for a first try, I'm not too embarrassed to post it here:

add salt to a water/white sugar syrup. It turns into crack.
I didn't take a picture because I was too embarrassed. Just take my word for it!
*added later: I think I've figured it out. I added the salt once the sugar/water solution was boiling, AND I used fairly large-grained salt, which gave the sugar something to crystallize around. Is that a scientifically sound conclusion?
**added later still: It must have been the size of the salt crystals. Or the type of salt. Or I didn't cook the sugar/water enough. Or I boiled for too long. Because since this post, I've made caramel twice, and both involved adding fleur de sel at the end and...no crack! Just yummy, tasty caramel!
 A friend and I went out to see the movie 'Julia and Julia'...and we both loved it! I've read some of the reviews, but I'm no film critic, so I don't care if the segues were choppy.
Here's the rundown, the things that make this movie fantastic.
1) It celebrates marriage and portrays men as intelligent, sympathetic, supportive, and all-around nice. No Simpson-esque stereotypes here!
2) The food. The glorious food! Imagine seeing a delicious beouf bourguignon on a huge screen...of course, you have to go through the agony of the horribly destroyed, burnt-to-a-sticky-mess beouf bourguignon first, but it's worth it!
3) The humour. I don't want to give anything away, but there are a lot of good lines!
4) The actors. Or more specifically, the actor. Not to detract from any of the other performances, but it goes without saying that Meryl Streep is une actrice par excellence. She is Julia Child. But not in a creepy way.
5) The food. Have you ever seen a de-boned duck emerging from the oven all cosily wrapped up in pastry?
6) The scenery. I don't know where the film was shot, but it's set in Paris. Need I say more?
7) The food! And all the gadgets required to Master the Art of French Cooking. Those gorgeous copper pots and pans. The rolling pins. The mortar and pestle. I freely admit to being vastly envious, but it was a treat just to see all those things in one place. Stores down here don't sell tart pans with removable bottoms, never mind aspic molds.
So, as you might have discerned by now, I really enjoyed the movie! This is what I call entertainment: a subject I'm interested in, fabulous actors, a pretty set, a lovely ending...I had a smile plastered on my face almost the entire time. Totally worth the $7 or so it cost to get in!

 Which is, naturally, the lemon curd. I snapped a few pictures to illustrate the process, so here they are:
 1) Assemble your ingredients. You need 4 egg yolks, 2 tsp lemon zest, 4 tbsp butter, 3 fl. oz. freshly squeezed lemon juice, and (not pictured) 3/4 c sugar and a pinch of salt.
 2) Beat the egg yolks and sugar together. Add all the other ingredients EXCEPT for the lemon zest; mix, and put on the stove on low heat. Stir constantly.
3) Have the lemon zest waiting in a bowl. Have a strainer waiting so that when the mixture has thickened, you can strain it directly into the bowl.
 4) Once the mixture has cooled off a bit (give it a stir every once in a while), pour into pre-baked tart shell and bake at 300 for 7 minutes (it will still be jiggly-wiggly).
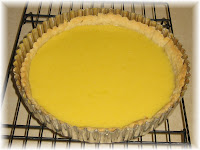 5) Here's what mine looks like! Yummo! I could eat lemon curd straight out of the bowl - yes, all of it - so I had better get going on the blueberry topping before it all disappears!
 Whenever I start a project (and there have been many starts), I get the urge to buy. Supplies, books, magazines...whatever might be applicable. Over the last ten years or so, I've begun to realize that buying stuff does not actually get the job done!
So when I decided to start this bloggety-blog, I immediately searched amazon.com and McNally Robinson for pastry and baking cookbooks. The good ones all run at $100+. I'm assuming that's because there's a limited market for these types of books, and because of the high cost of producing high-quality, informative illustrations and photographs.
Lately I've been trying to watch my spending more carefully, so after an hour or two of ogling gorgeous cookbooks, I remembered that I already have a wonderful selection. Some bought new, some bought at the Children's Hospital Used Book Sale, some received as gifts - it's quite the little library. The point being, I have more than enough to keep me occupied for several years at least! So I hauled out my Pie and Pastry Bible and looked up 'Blueberry' in the index. When I saw this recipe, I knew it was The One. Lemon is one of my all-time favourite flavours!
(By the way, don't bother trying to find a tart pan with a removable bottom in or around Winkler. I tried Superstore, Canadian Tire, Walmart, and Co-op...nothing.)
This recipe is actually a combination of 3: the pie crust, the blueberry filling, and the clincher: lemon curd. Rose Levy Beranbaum describes it like this:
"In addition to being delicious, this tart also provides several textural contrasts: a flaky, crunchy crust; creamy lemon filling; and burst-in-the-mouth berry topping. It is also beautiful to behold because though the berries do not cook or begin to break down, they turn dark blue from contact with the hot glaze."
How could I resist?
First, Basic Flaky Pie Crust
My attempts at pie crust generally come out looking ok but tough and chewy. Which is not flaky. So this time around, I'm going to try to follow the recipe to the letter. I don't have a food processor, so I'm using the 'hand method'. (I've also re-written the recipe so that it's shorter; if you want the real thing, along with variations and tips, get the book!)
 1) Divide 8 tbsp butter into a 3 tbsp portion and a 5 tbsp portion. Cut each portion into small cubes. Refrigerate the larger, freeze the smaller.
2) Mix 1-1/3 cups all purpose flour, 1/4 tsp salt, and 1/8 tsp baking powder. Freeze in mixing bowl for 30 minutes. Also chill another bowl.
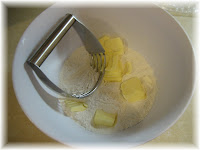
3) Using a pastry cutter and/or fingers, cut/rub the larger portion of butter into the flour mixture.
4) Spoon the mixture, together with the smaller portion of butter, into a large resealable bag. Use a rolling pin to flatten the butter into flakes. (Is this the equivalent of what I've seen chefs on shows do...with the heel of their hand against the counter top? Is one method preferable to the other?)5) Transfer mixture to chilled bowl. Sprinkle with 2-1/2 tbsp ice water (can add more later if needed) and 1-1/2 tsp cider vinegar. Toss lightly with a spatula. Return mixture to bag. 6) Kneed mixture inside bag until it holds together.7) Wrap dough with plastic wrap, flatten into a disc, and refrigerate for 45 minutes.8) To roll out and bake, remove pastry from fridge and allow to rest for 10 minutes.
9) And I quote: "Always work quickly so that the dough doesn't  have a chance to soften. Use a firm steady pressure to roll the dough into a circle about 1/8 inch or slightly less thick. As the centre tends to be the thickest part, roll from the centre out." etc.
 10) Once in the tart pan, trimmed and ready to go, make sure the oven is preheated to 425. Line the dough with parchment paper. Fill with dried beans. Bake for 20 minutes.
11) Lift out parchment with beans and prick crust all over with fork. Return to oven for 5-10 minutes until pale golden brown.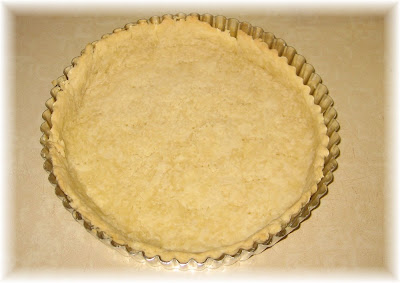 Et voila! I'm not so sure it's supposed to shrink quite so violently, but...Stay tuned for the Lemon Curd and final product!
 A cranky apartment stove. In my 4 apartments, I would rate this stove 2nd worst. It's ancient! And the thermometre is waaaay out:
As you may or may not be able to see, this dial points to approximately 350.  And, as you may or may not be able to see, the thermometre inside the oven shows approximately 400. That's a 50-degree difference! Somewhat significant, I would say.
I hereby appeal to my landlord, to whom I pay ever-increasing amounts of rent, to equip my apartment with a better oven. I'm not picky, but gas would be nice. The sooner the better, because then I won't have to clean it!
 If I'm going to bake my way through this tome, I'm going to have to face making starter. That worries me. What if I just make mold instead of yummy, yeasty starter?
So I chose a bread that I knew I could make: Buttermilk Potato Bread. (Which means I now need to find more recipes that use buttermilk, since you can't buy it in less than 1L quantities.)
To make a long story short, here's the outcome:
 Oops! I forgot to glaze it. My taste buds won't care though...BLTs, here I come!
 Well, it's a Bon Appetit magazine recipe...they're usually well written and easy to follow, which results in delectable amazing-ness! Here's the run-down of cake assembly:
 You start by laying down one of the meringue layers. I 'glued' it on to the cake keeper with some frosting. I guess it was necessary, but it make cutting neat slices challenging.
 Meringue, frosting, cake, syrup, frosting, meringue, frosting...
 I used a decorative tip to cover up the messy frosting edges; I'd like to try making this cake again, just to go for a neater, more consistent look.
 And finally, the end result. Despite my qualms over the frosting, it turned out! And since this cake was meant to be a 'thank you' cake, I'm glad it did.


